
Dragon's Dogma 2 - Sphinx Riddles And Solutions
GameSpot may receive revenue from affiliate and advertising partnerships for sharing this content and from purchases through links.
There are many secrets to discover in Dragon's Dogma 2. Very few, however, can match this one in terms of creativity, as well as the level of frustration that you're likely to feel. Here's our Dragon's Dogma 2 Sphinx riddles and solutions guide to help you with A Game of Wits.
How to solve the Sphinx riddles Dragon's Dogma 2
There are a total of 10 Sphinx riddles in Dragon's Dogma 2. Every puzzle that you solve nets you a reward from a chest. You can also obtain an even more enticing reward from the larger chest once you solve all the riddles.
Note: For PC players, we recommend keeping backup saves just in case you make an error when attempting the riddles. You can find your save files in: C:\Program Files (x86)\Steam\userdata\<user ID>\2054970\remote\win64_save.
Sphinx location #1

GameSpot may receive revenue from affiliate and advertising partnerships for sharing this content and from purchases through links.
There are many secrets to discover in Dragon's Dogma 2. Very few, however, can match this one in terms of creativity, as well as the level of frustration that you're likely to feel. Here's our Dragon's Dogma 2 Sphinx riddles and solutions guide to help you with A Game of Wits.
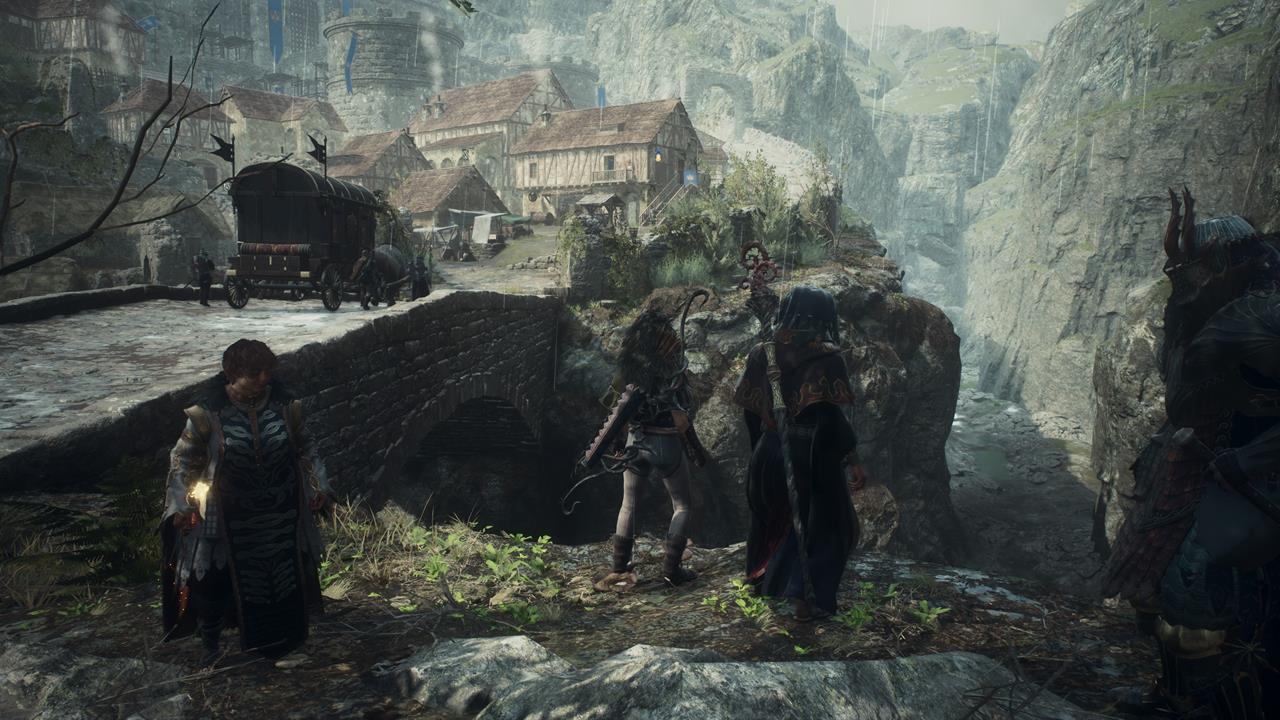
Once you get past the Ancient Battleground, you'll meet an NPC named Oskar. He has a quest called Tolled to Rest. Although completing it isn't required to solve the Sphinx's riddles in Dragon's Dogma 2, you might as well tackle the objective along the way.
It simply involves helping Oskar enter the ruins above the hill. Inside the crypt, you'll even find the Nation's Death Knell, a grimoire for Trysha or Myrddin.

GameSpot may receive revenue from affiliate and advertising partnerships for sharing this content and from purchases through links.
There are many secrets to discover in Dragon's Dogma 2. Very few, however, can match this one in terms of creativity, as well as the level of frustration that you're likely to feel. Here's our Dragon's Dogma 2 Sphinx riddles and solutions guide to help you with A Game of Wits.
How to solve the Sphinx riddles Dragon's Dogma 2
There are a total of 10 Sphinx riddles in Dragon's Dogma 2. Every puzzle that you solve nets you a reward from a chest. You can also obtain an even more enticing reward from the larger chest once you solve all the riddles.
Note: For PC players, we recommend keeping backup saves just in case you make an error when attempting the riddles. You can find your save files in: C:\Program Files (x86)\Steam\userdata\<user ID>\2054970\remote\win64_save.
Sphinx location #1
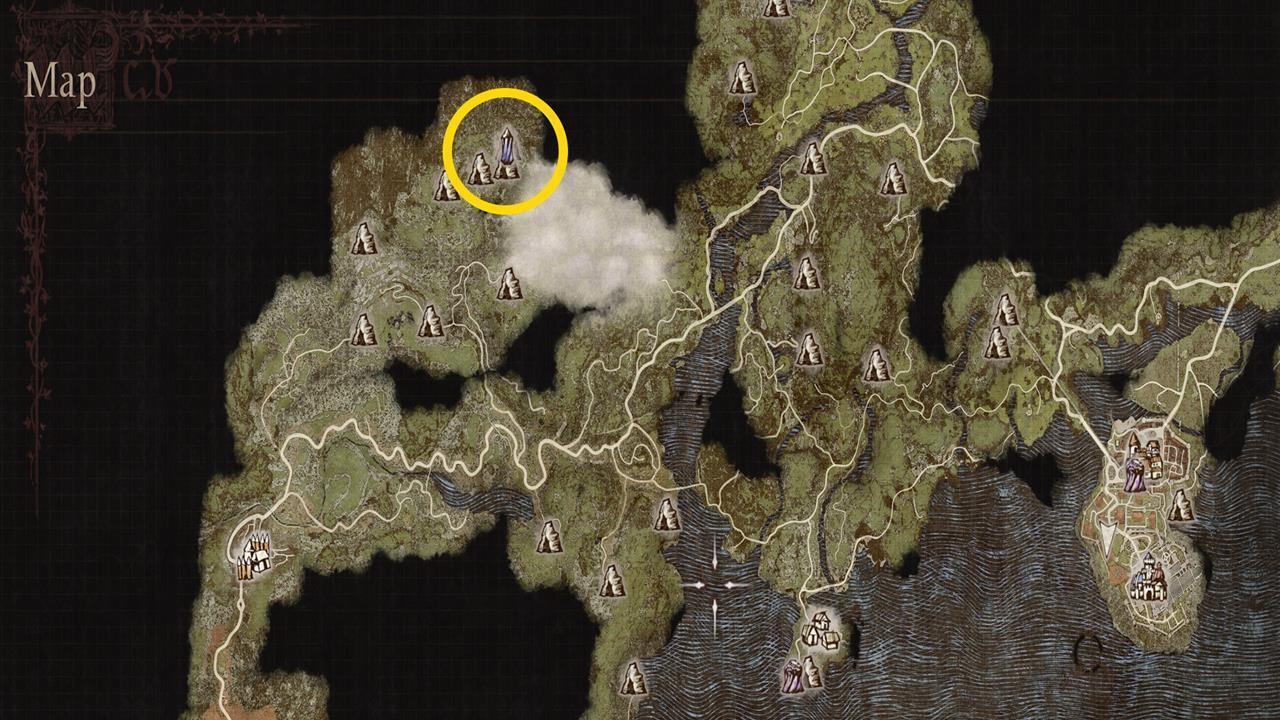
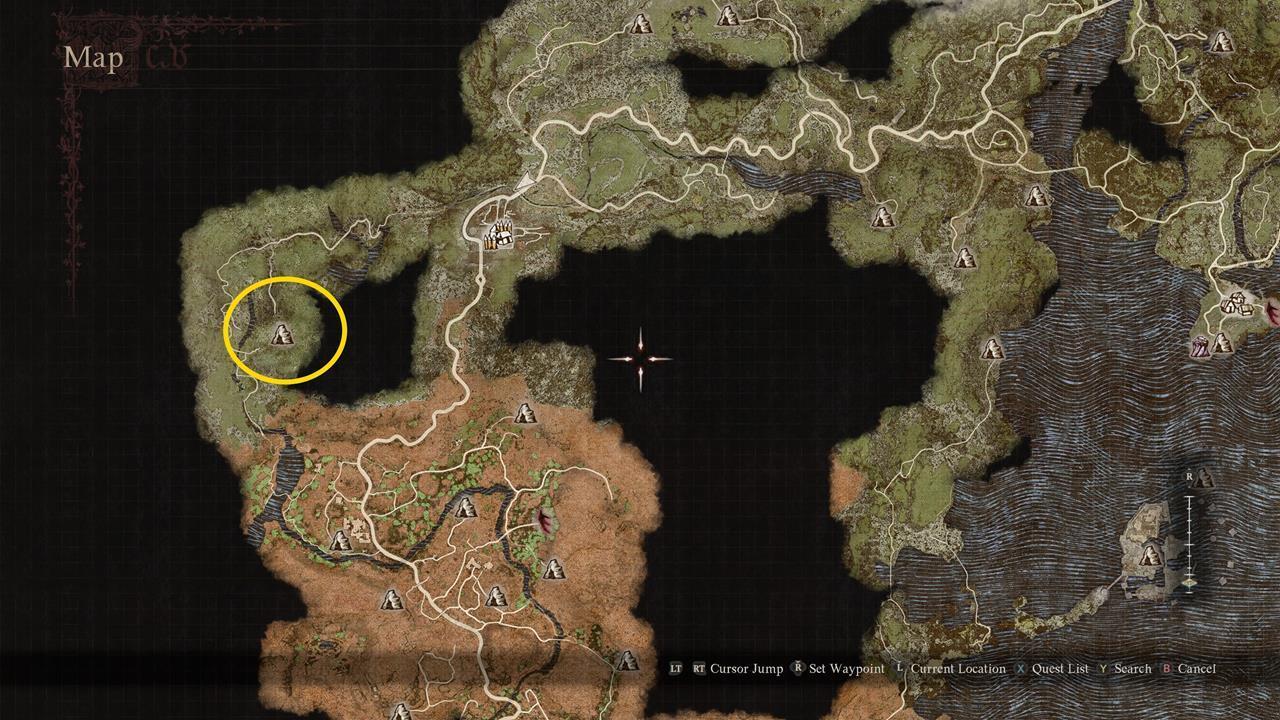
To find the Sphinx's first location, you have to go to the Mountain Shrine, which is well north of Checkpoint Rest Town. Follow the road going north until you reach the Ancient Battleground.
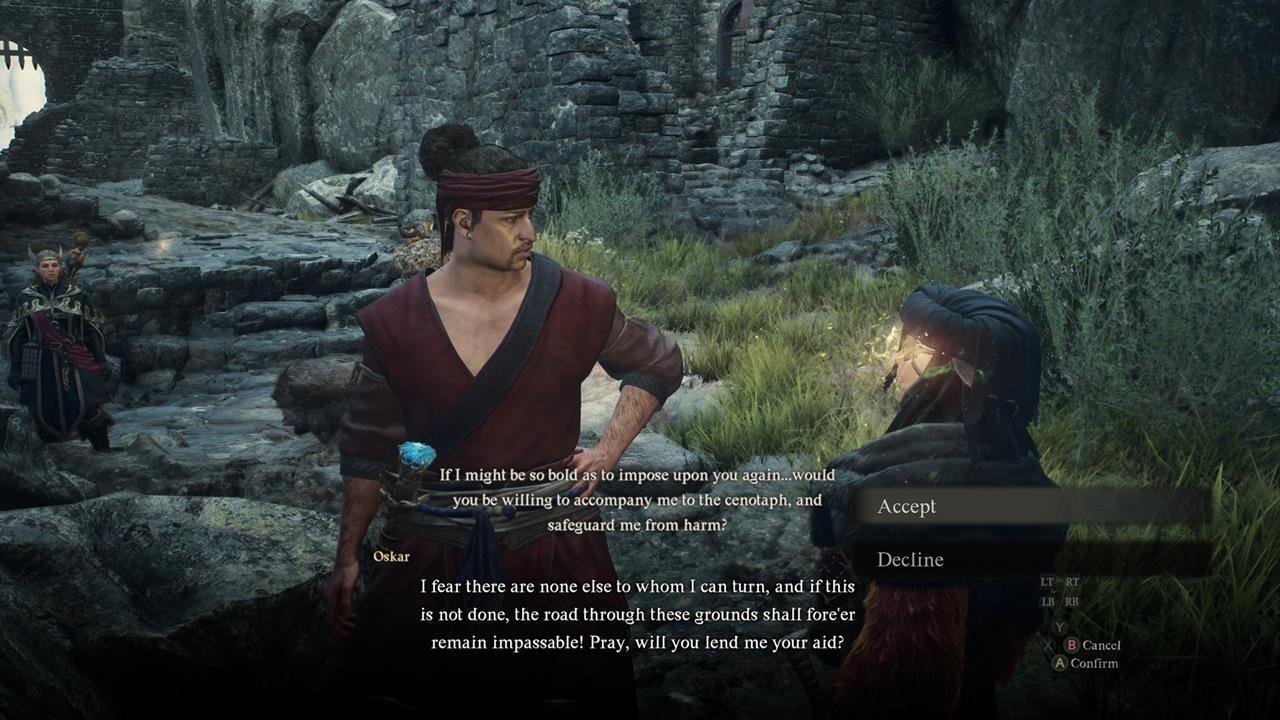
Meeting Oskar in the Ancient Battleground
Once you get past the Ancient Battleground, you'll meet an NPC named Oskar. He has a quest called Tolled to Rest. Although completing it isn't required to solve the Sphinx's riddles in Dragon's Dogma 2, you might as well tackle the objective along the way.
It simply involves helping Oskar enter the ruins above the hill. Inside the crypt, you'll even find the Nation's Death Knell, a grimoire for Trysha or Myrddin.
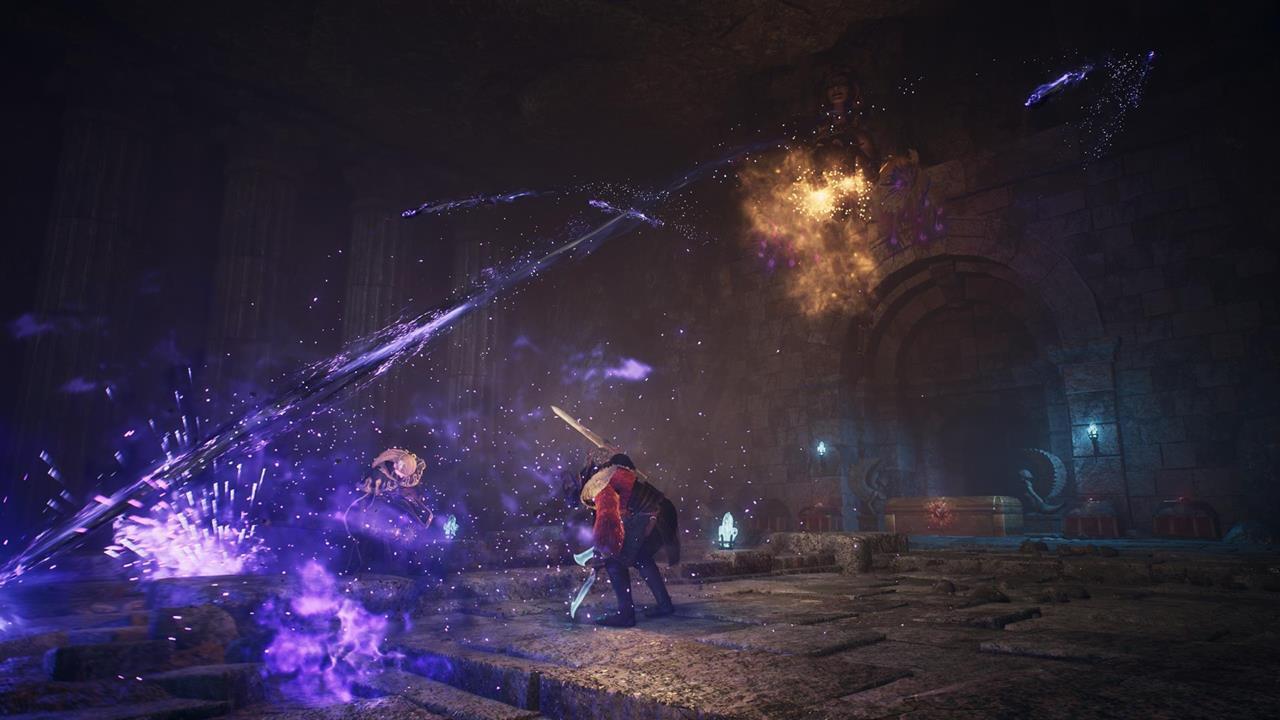
Going through the Worldsend Cavern
Continue to the top of the ruins until you spot a lone Cyclops. Take it out and climb the ledges along the cliffside area. You'll find yourself at the Worldsend Cavern, which is a tunnel system that's filled with phantoms.

Climbing up to the Mountain Shrine
Upon exiting Worldsend Cavern, look to your right to see a series of ledges carved along the cliff. These lead you to the Mountain Shrine and the Sphinx's lair. We recommend placing a Portcrystal here. You're going to fast travel back to this area often, so you might as well save some time.
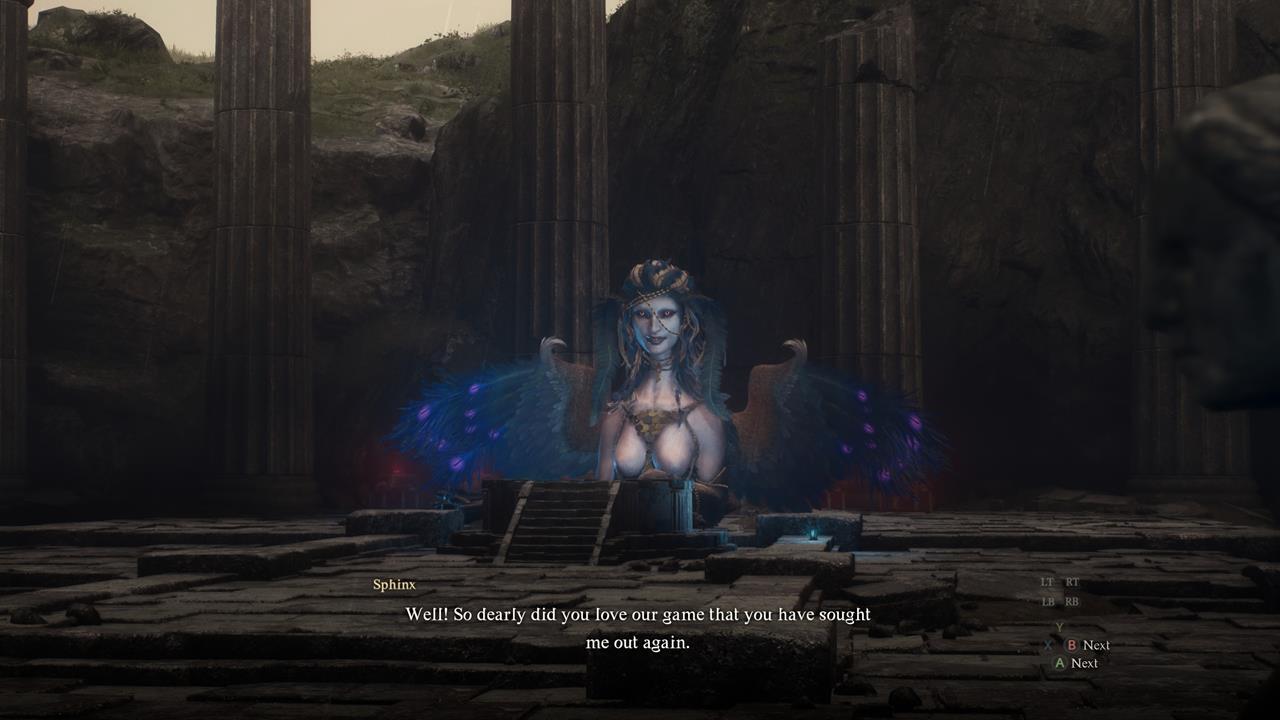
Should you fight the Sphinx early?
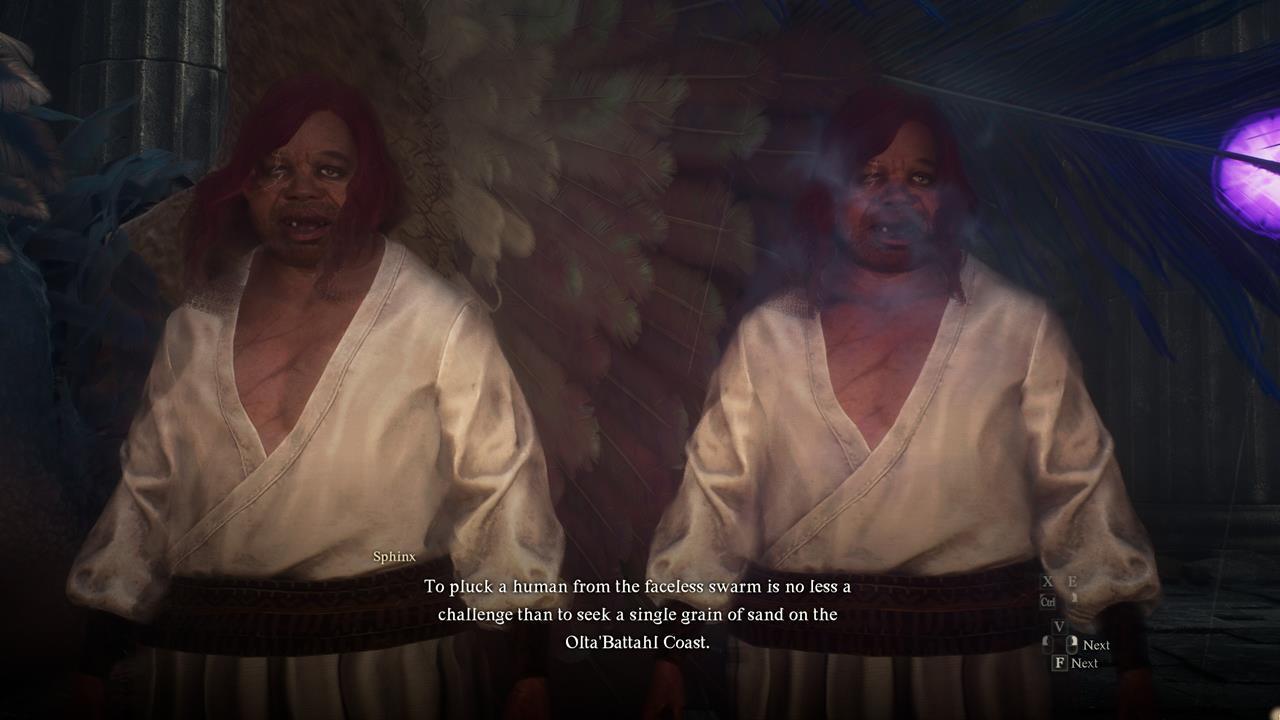
The Dragon's Dogma 2 Sphinx is very different from most other boss creatures. That's because she won't attack you immediately, and you should be able to speak with her.
We can't stress this enough, but you should NOT fight the Sphinx at all. Doing so will just cause her to fly away, ending this entire arc before it could even begin.
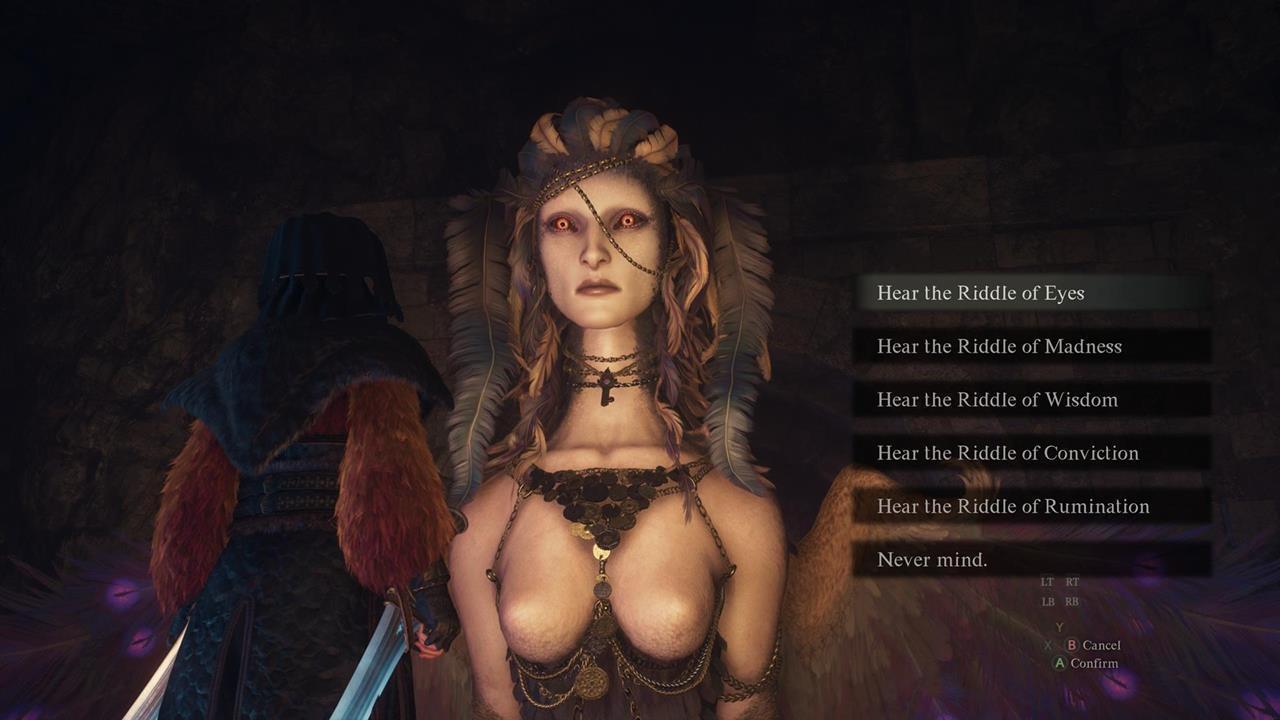
A Game of Wits: The first set of Sphinx riddles
These are the Sphinx riddles in the Mountain Shrine, which is the first part of a quest called A Game of Wits:
- Riddle of Eyes
- Riddle of Madness
- Riddle of Wisdom
- Riddle of Conviction
- Riddle of Rumination
How to solve the Riddle of Eyes
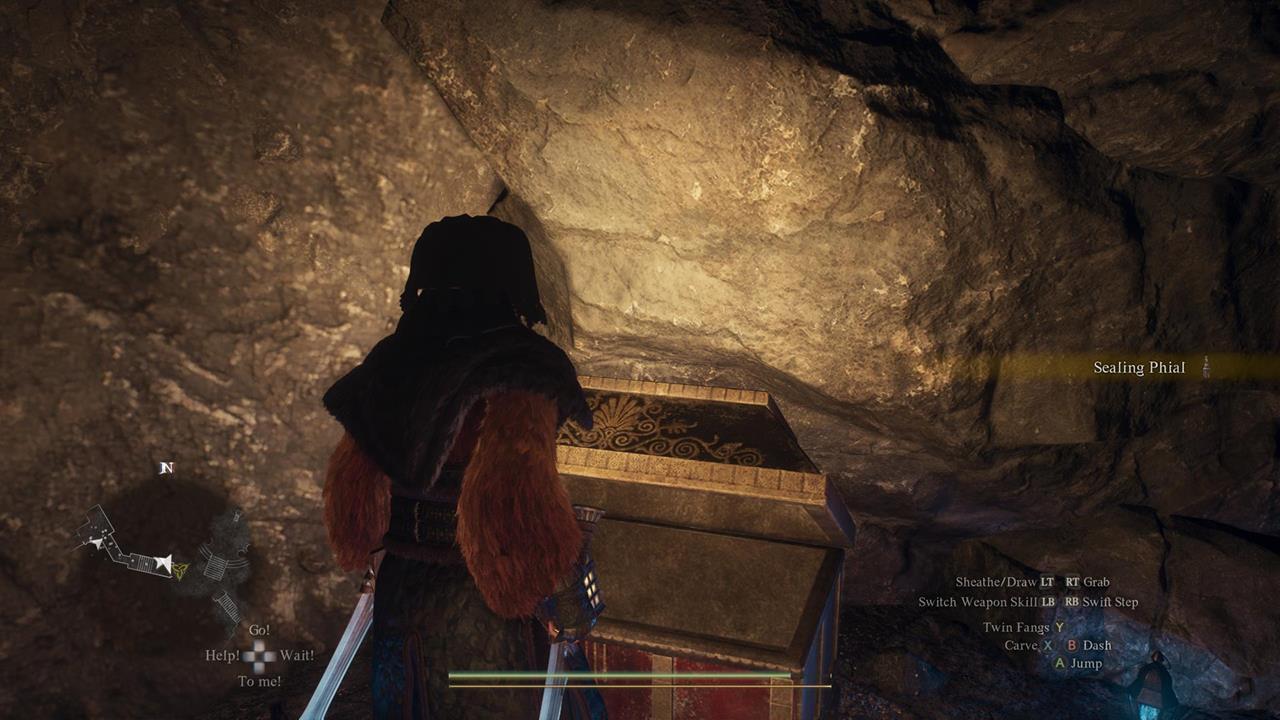
Riddle: "Our eyes are our allies, yet oft do they betray, for eyes tell lies, so I advise, and thence do lead astray. Yet how will your eyes advise you? Venture through yonder door and retrieve that which is of greatest value."
Solution: The Sphinx will open the cracked doorway for you. Inside is a vast tunnel system that's crawling with hobgoblins and even an Ogre. If you look above the entrance, you'll see a chest that has a Sealing Phial. This is what you should give the Sphinx. Note that there's another chest deeper in the chambers, but it's the incorrect item.
Reward: 1x Wakestone

How to solve the Riddle of Madness
Riddle: "Love is as twin to madness, they say. They are bound fast, as night is to day. So bring forth your most beloved to me, that I might gauge the depth of your insanity."
Solution: You need to bring the person with whom you have the highest affinity value with (as noted in our romance/affinity guide). For us, it was Ulrika. Although we had also romanced Wilhelmina in our playthrough, we received an achievement notifying us that we maxed out someone's affinity--and that was when we gave gifts to Ulrika. We did not even need to complete her quests.
In any case, carry whoever that person in your arms. Then, use a Ferrystone to teleport back to the Mountain Shrine. Place that person on the pedestal and tell the Sphinx that they're your beloved.
Reward: 1x Portcrystal
Update: We've been told that carrying your main pawn and placing them on the dais should also work.
How to solve the Riddle of Wisdom
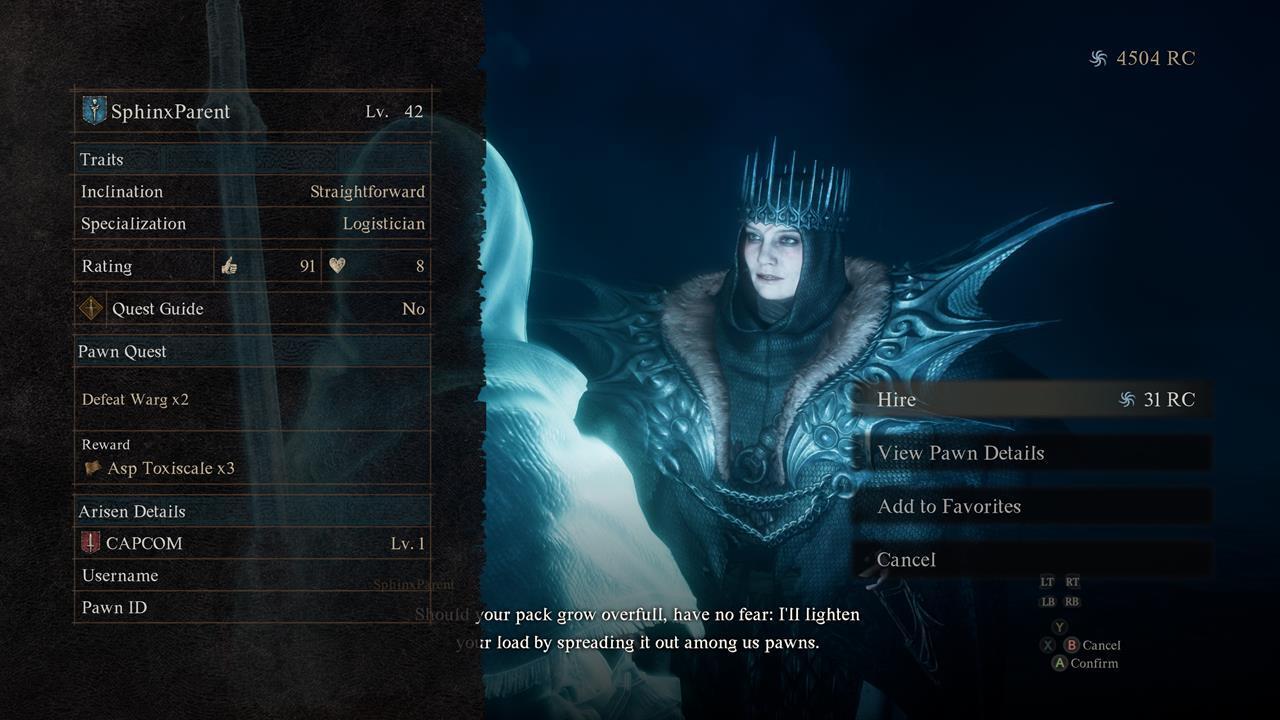
Riddle: "The parent knows the child, yet the reverse is far from true. The child knows not the parent; such is the parent's due. I am a lost child, for kinship do I yearn. So bring to me my parent, that I may learn."
Solution: This Dragon's Dogma 2 Sphinx riddle might stump a lot of folks because the solution isn't as obvious at first glance. Basically, you need to bring a Capcom-made pawn that has "Sphinx" as a moniker:
- If you've already tagged a Riftstone of Fellowship, it will allow you to summon pawns with a special moniker.
- Pawns with the following names do work: SphinxParent, SphinxMother, and SphinxFather.
- Just in case other players start making pawns with a similar name, remember that the pawn has to come from Capcom (which you should see at the bottom of the panel).
- Teleport back to the Mountain Shrine and carry the pawn on your shoulders so you can bring them to the dais.
Reward: 1,200x RC
How to solve the Riddle of Conviction
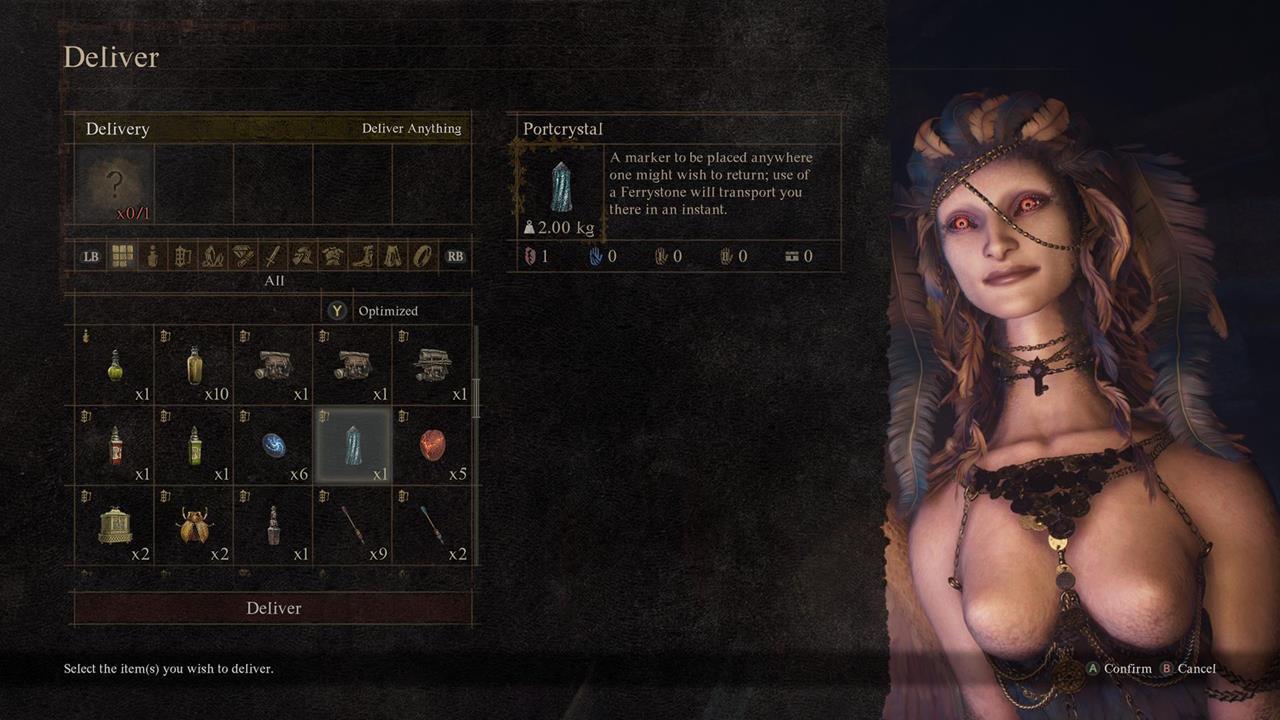
Riddle: "Life is an enigma--a lender of mortal debt. Yet lighter pack makes fleeter foot and challenge nimbly met. So grant to me what you most prize, and hence elude your ponderous demise."
Solution: Initially, we thought that this riddle required us to give the Sphinx the most expensive item we had in our inventory. However, any item works. Basically, this riddle will just duplicate any item you give. As such, we recommend choosing something that's really hard to find or expensive, such as a Portcrystal.
Reward: 1x Portcrystal
How to solve the Riddle of Rumination
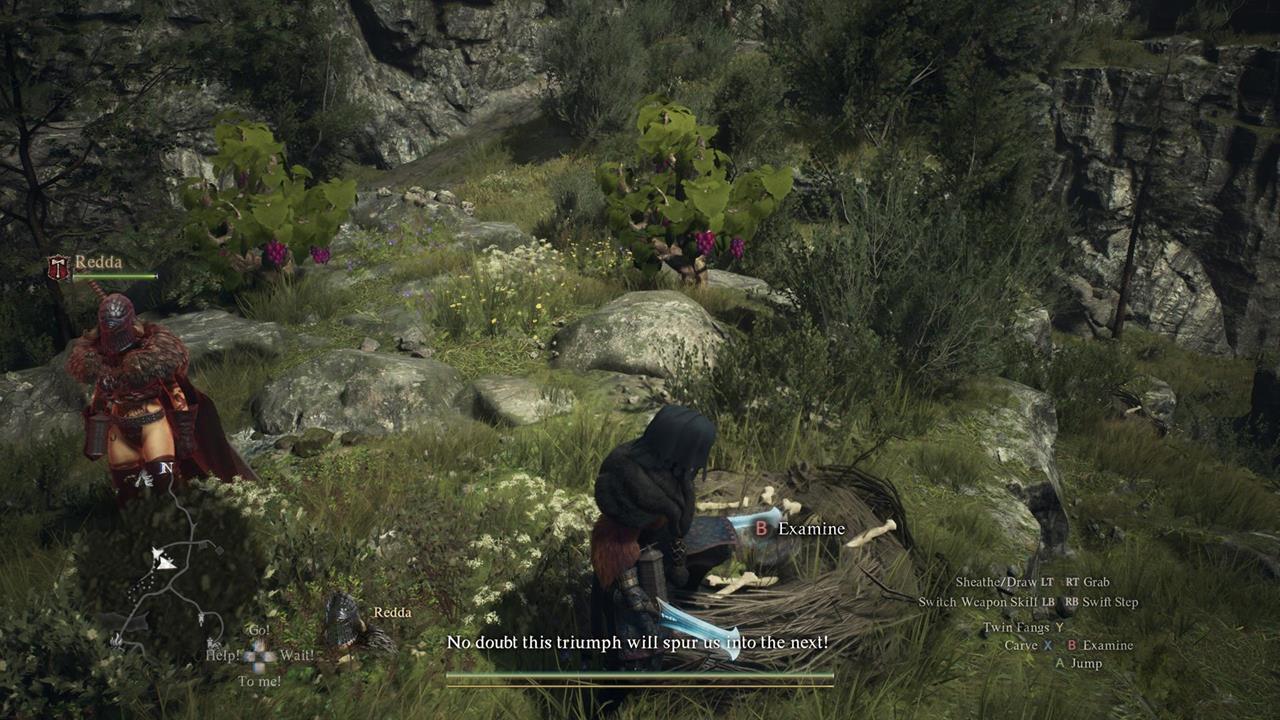
Riddle: "You know of Seeker's Tokens, I trust? Those keepsakes of a fondly remembered journey? Yet where it was that you found your first? Retrace your steps, if you can--you might make a new discovery."
Solution: This will be very tricky if you no longer remember where you found your first Seeker's Token. The Sphinx will also give you just seven in-game days to return to wherever that area might be.
For us, it was the one in a nest atop a small hill. The spot was just north of the campsite outside Melve. Upon going there, we found a Finder's Token. We then retrieved it and returned to the Sphinx.
Reward: 3x Ferrystone
Tip from DeerGodWye in the comments section: If you're having trouble looking for the first Seeker's Token that you obtained, then perhaps you can unlock the Trickster vocation. Its Detection augment causes Wakestones and Seeker's Tokens to flash, as well as emit a tapping sound effect.
We can't confirm if the Detection augment also works on the Finder's Token. However, as long as you remember the general area where you found your first Seeker's Token, then it might help.
Sphinx location #2: Continuing A Game of Wits
After you're done with the first set of puzzles (whether you solved them all successfully or failed a few), the Sphinx will fly away. However, she'll also tell you that she'll move to a new location: the Frontier Shrine. It's due west of Checkpoint Rest Town.
How to reach the Frontier Shrine
There are a couple of ways to reach the Frontier Shrine on foot:
- Follow the dried up stream below the bridge that leads to Checkpoint Rest Town. Then, climb up the crags and follow the winding canyon to the shrine.
- There's also a longer route, where you exit the southern part of Checkpoint Rest Town, then cross the river to the west. Continue up the high ridge and past the Saurian-infested cave until you arrive at the shrine.
Here are some important reminders moving forward:
- Don't forget to place down another Portcrystal in the Frontier Shrine since you're going to return to this location often.
- You might want to switch to an Archer later--i.e. before you attempt the 10th and final riddle. We'll tell you why soon enough.
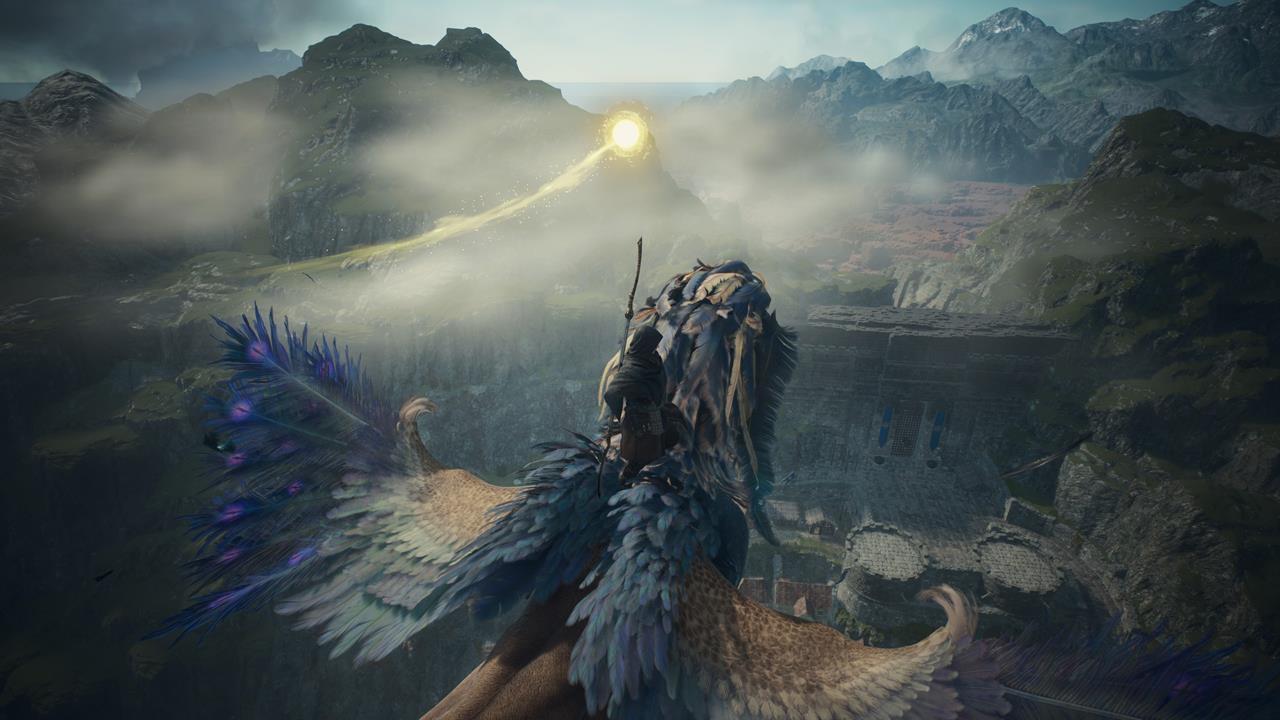
Alternative method: Flying on the back of the Sphinx
Believe it or not, it's possible to ride on the back of the Sphinx, but you do need to be quick about it. As soon as the Sphinx finishes talking, jump up and press the "Grab" button. Then, move around her until you're on her nape (i.e. the back of her neck).
Because the Sphinx flies levelly for several minutes, you should be able to stand on her nape without expending stamina. Just watch out because she'll do a steep dive once she's about to enter the cave, which means you have to grab hold of her once more.
This is the fastest way to reach the Frontier Shrine. The only downside is that you won't be able to open the fifth chest--assuming you solved that riddle correctly--since you need to grab hold of the Sphinx before she flies off. You can always come back for it later.
How to solve the Riddle of Reunion
Riddle: N/A - This isn't really a riddle.
Solution: Basically, when you arrive at the Frontier Shrine, the Sphinx will be ecstatic at your efforts in finding her.
Reward: 100,000 gold
Important:
- After reaching the Sphinx's second location for the Riddle of Reunion, it seems that we couldn't choose which riddle we'd tackle anymore (unlike the first part). There are four more riddles remaining, and she can give them to you in any order:
- Riddle of Differentiation
- Riddle of Contest
- Riddle of Futility
- Riddle of Recollection
- Again, be ready to switch to an Archer before you attempt the tenth and final riddle. You're going to have to use a certain special projectile down the line.
How to solve the Riddle of Differentiation
Riddle: "I seek this man. If men are so distinct, I'm sure you'll meet him in a trice."
Solution: The Sphinx will show you an image of a tubby red-haired man wearing a white robe, but there are some distinctions, which you should see if you check the History - NPC Logbook:
- Dante - Has straight hair and a straight scar on his eye; found in the market area near the entrance of Checkpoint Rest Town.
- Vergil - Has wavy hair and a jagged scar on his eye; found just past the gate in Checkpoint Rest Town.
After that little Capcom reference, take note of the individual's look, then go to the location. Once you find the person, carry him and teleport back to the Frontier Shrine.
Reward: Whimsical Daydream - Trickster class weapon
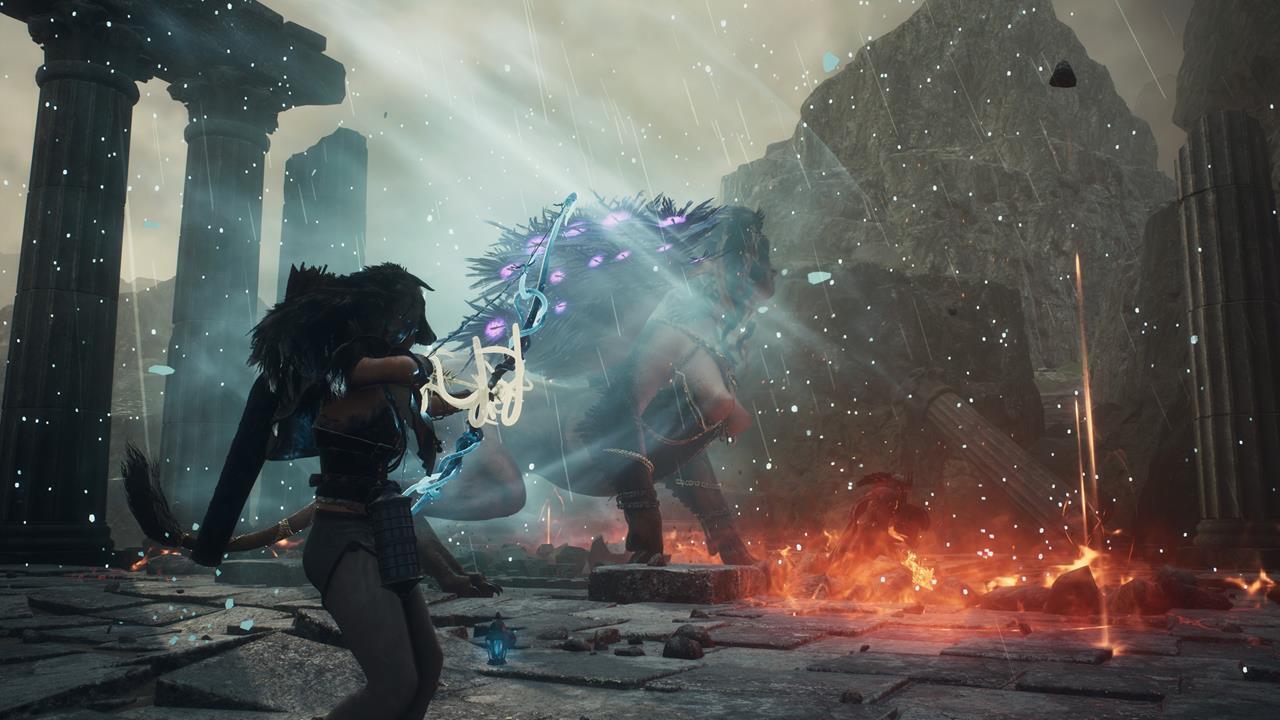
How to solve the Riddle of Contest
Riddle: The Sphinx will spawn an armored combatant, and she'll force you to equip a Ring of Derision. It will weaken all your attacks to the fullest extent, which means you'll barely do damage.
Solution: Stagger your opponent, then carry them and toss them off the cliff.
Reward: Ring of Ambition - Increases XP gains from defeating enemies.
How to solve the Riddle of Futility
Riddle: "Here I have an amphora destine for Ser Maurits in Bakbattahl. Deliver it to him, but beware; it's rather fragile."
Solution: Your initial thought might be to carry the vase all the way to the marked location. However, there are some key requirements:
- Because the amphora is fragile, you can't let yourself get attacked or it will break instantly. You need to place it down whenever you see enemies in the vicinity.
- If it breaks, the Sphinx will simply fly away and you'll fail the remaining riddles.
- You cannot fast travel either.
But wait: remember what we've done a few times when we solved Sphinx Riddles in Dragon's Dogma 2? We were bringing characters to her, and it's possible to do that with Ser Maurits as well. Simply fast travel to Bakbattahl and go to the marked location where you'll find Maurits. Carry him on your shoulders and teleport back to the shrine. When you drop him next to the amphora, this objective will still get completed normally.
Reward: Eternal Bond - Give this ring to an NPC to greatly boost your relationship/affinity with them.
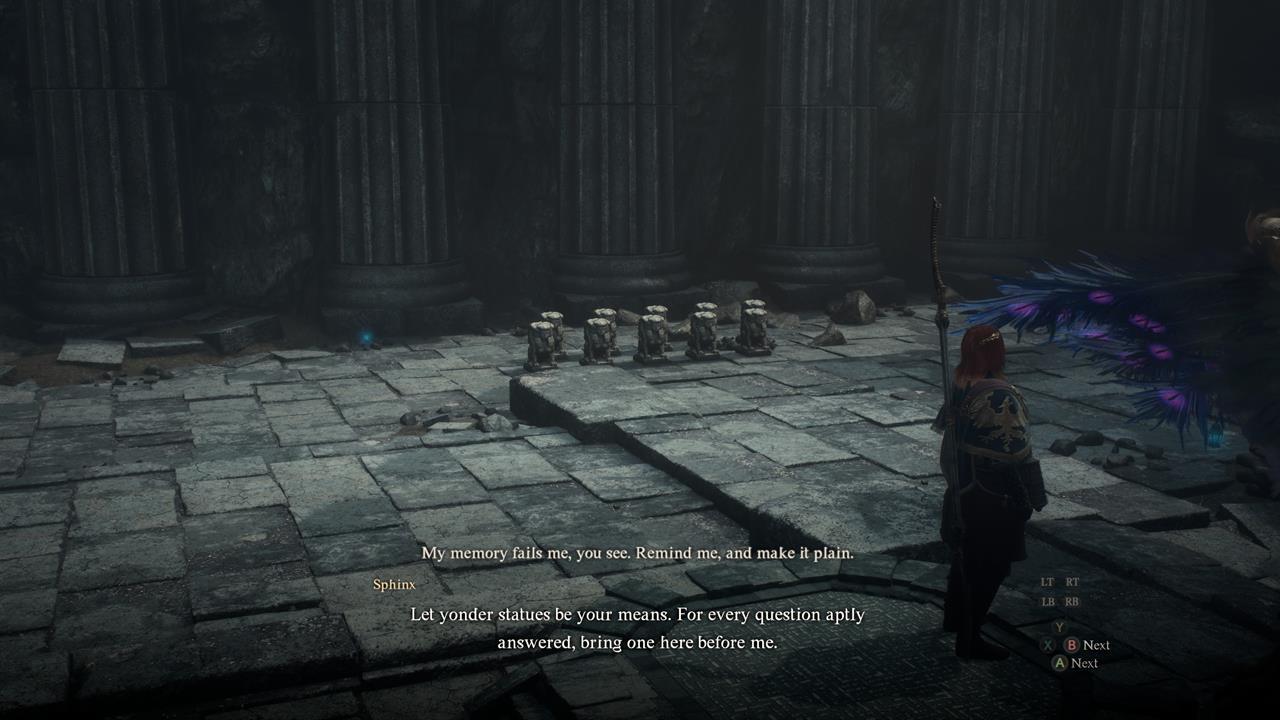
How to solve the Riddle of Recollection
Riddle: "My memory fails me, you see. Remind me, and make it plain. Let yonder statues be your means. For every question aptly answered, bring one here before me."
Solution: Carry and place the correct number of statues on or near the dais (i.e. in front of the Sphinx). You should only place as many statues depending on the number of riddles that you guessed correctly.
For us, this was the last Dragon's Dogma 2 Sphinx riddle that we got. Since we successfully solved the previous ones, it meant that we had to place nine statues.
Reward: Unmaking Arrow - The ultimate arrow; said to kill instantly. Once fired, the game will automatically save, so choose your moment with due care.
Defeating the Sphinx and obtaining the final reward
The Dragon's Dogma 2 Sphinx riddles are done, but the large treasure chest in the shrine remains sealed. So, how exactly do we open it? Here's what you need to know:
- Upon solving the 10th and final riddle, the Sphinx will attempt to fly away.
- Based on a clue from the mural near where you found Ser Maurits, you have to strike the Sphinx with a melee weapon to initiate combat.
- If you already switched to the Archer class beforehand, normal shots might not initiate combat at all. Instead, you need to attack her and select the "Go" command to make melee class pawns hit her, too.
- Alternatively, you can use the Warfarer vocation. Just make sure that one class option is melee-oriented and the other is the Archer.
- Once combat has begun, equip the Unmaking Arrow that you obtained from the Riddle of Recollection. Then, take aim and shoot her with it.
- Shooting the Sphinx with the Unmaking Arrow kills her, causing her to drop the Key of Sagacity. Use it to unlock the large treasure chest in the shrine.
Reward: Eternal Wakestone - Allows you to revive multiple NPCs at the same time. This also nets you the Reaper's Scorn achievement when used.
Note: Lastly, you might be wondering what would happen if you just battle the Sphinx normally without using the Unmaking Arrow. Well, she'll still attempt to escape once her HP gets too low. You also won't be able to grab hold of her, and you probably won't be able to do enough DPS within the timeframe. She'll escape, and that's the last that you'll see of her.
In any case, these are the Dragon's Dogma 2 Sphinx riddle solutions and rewards for A Game of Wits. These might cause some headaches, so be forewarned.


0 Comments